Physical Computing - Relay & Motor, Servo, Stepper Motor, LCD 1602

Adam Boucek
|October 31st 2023
In this lab, we will continue with another set of projects you can create with ESP32-WROVER. Instructions are given by Andrew J. Park, Ph.D..
We will use Freenove Ultimate Starter Kit for ESP32-WROVER which you can buy on Amazon. How to set up the kit and start uploading code you can find on Freenove.
If these projects seem too challenging you can try to do the Freenove tutorials. See them in the tutorials section ↓.
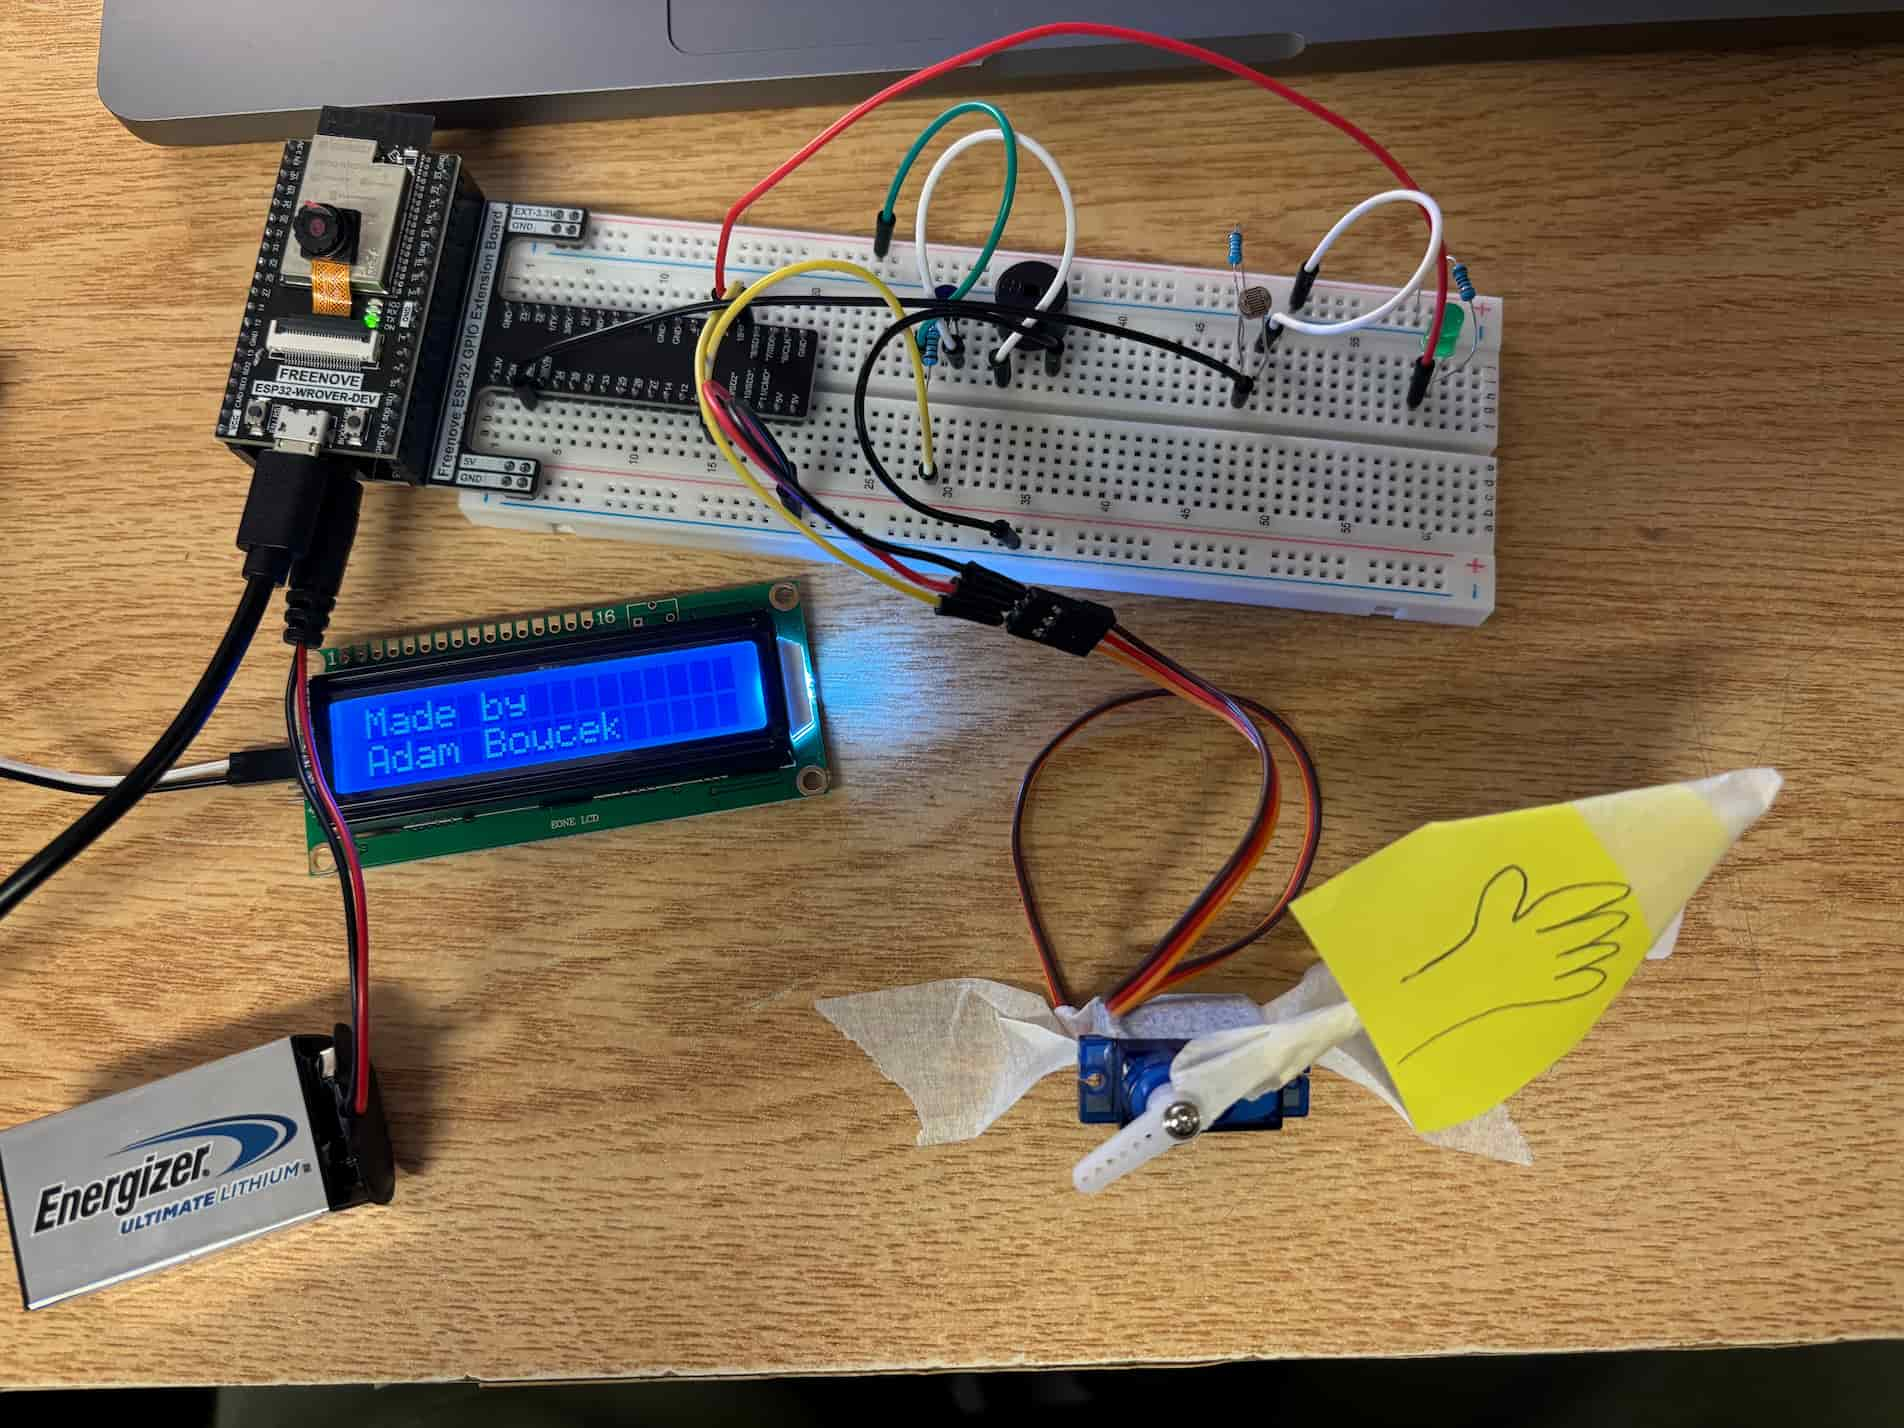
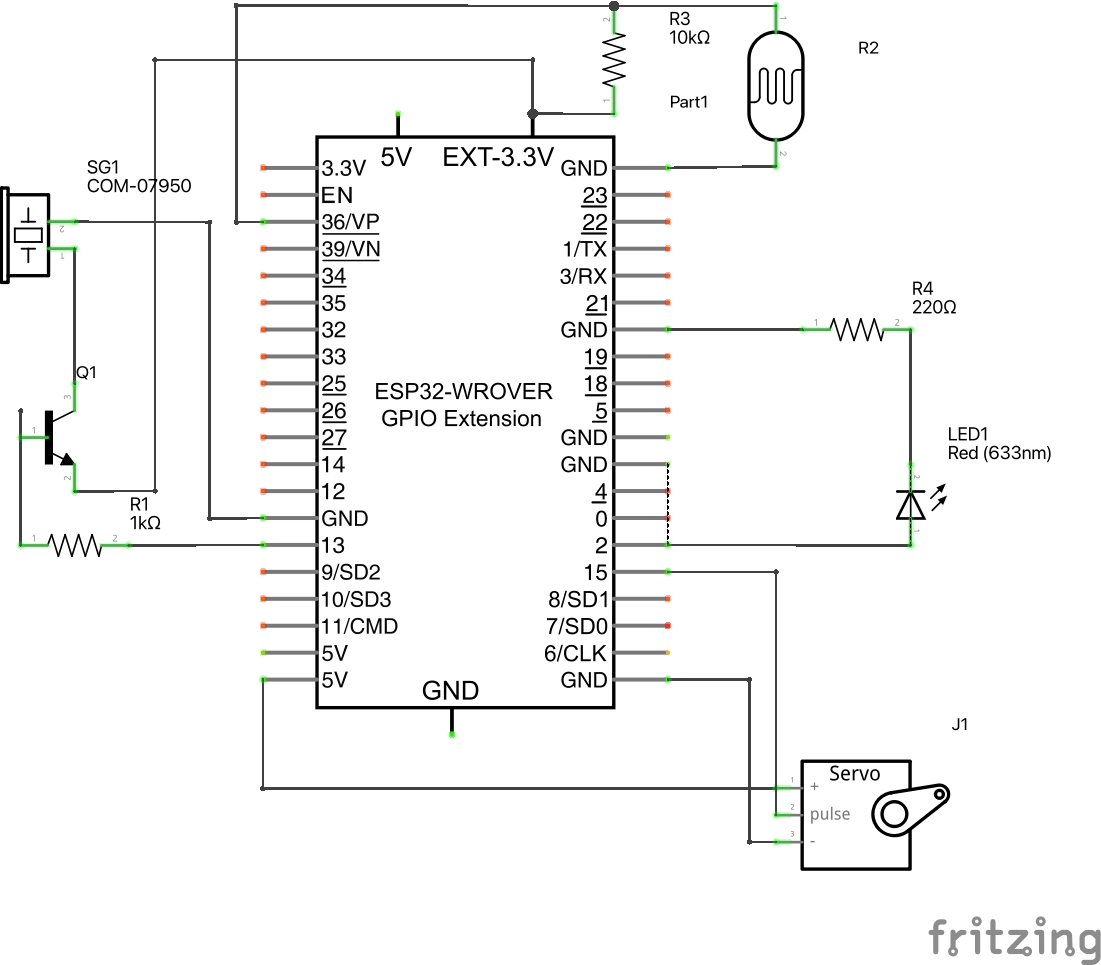
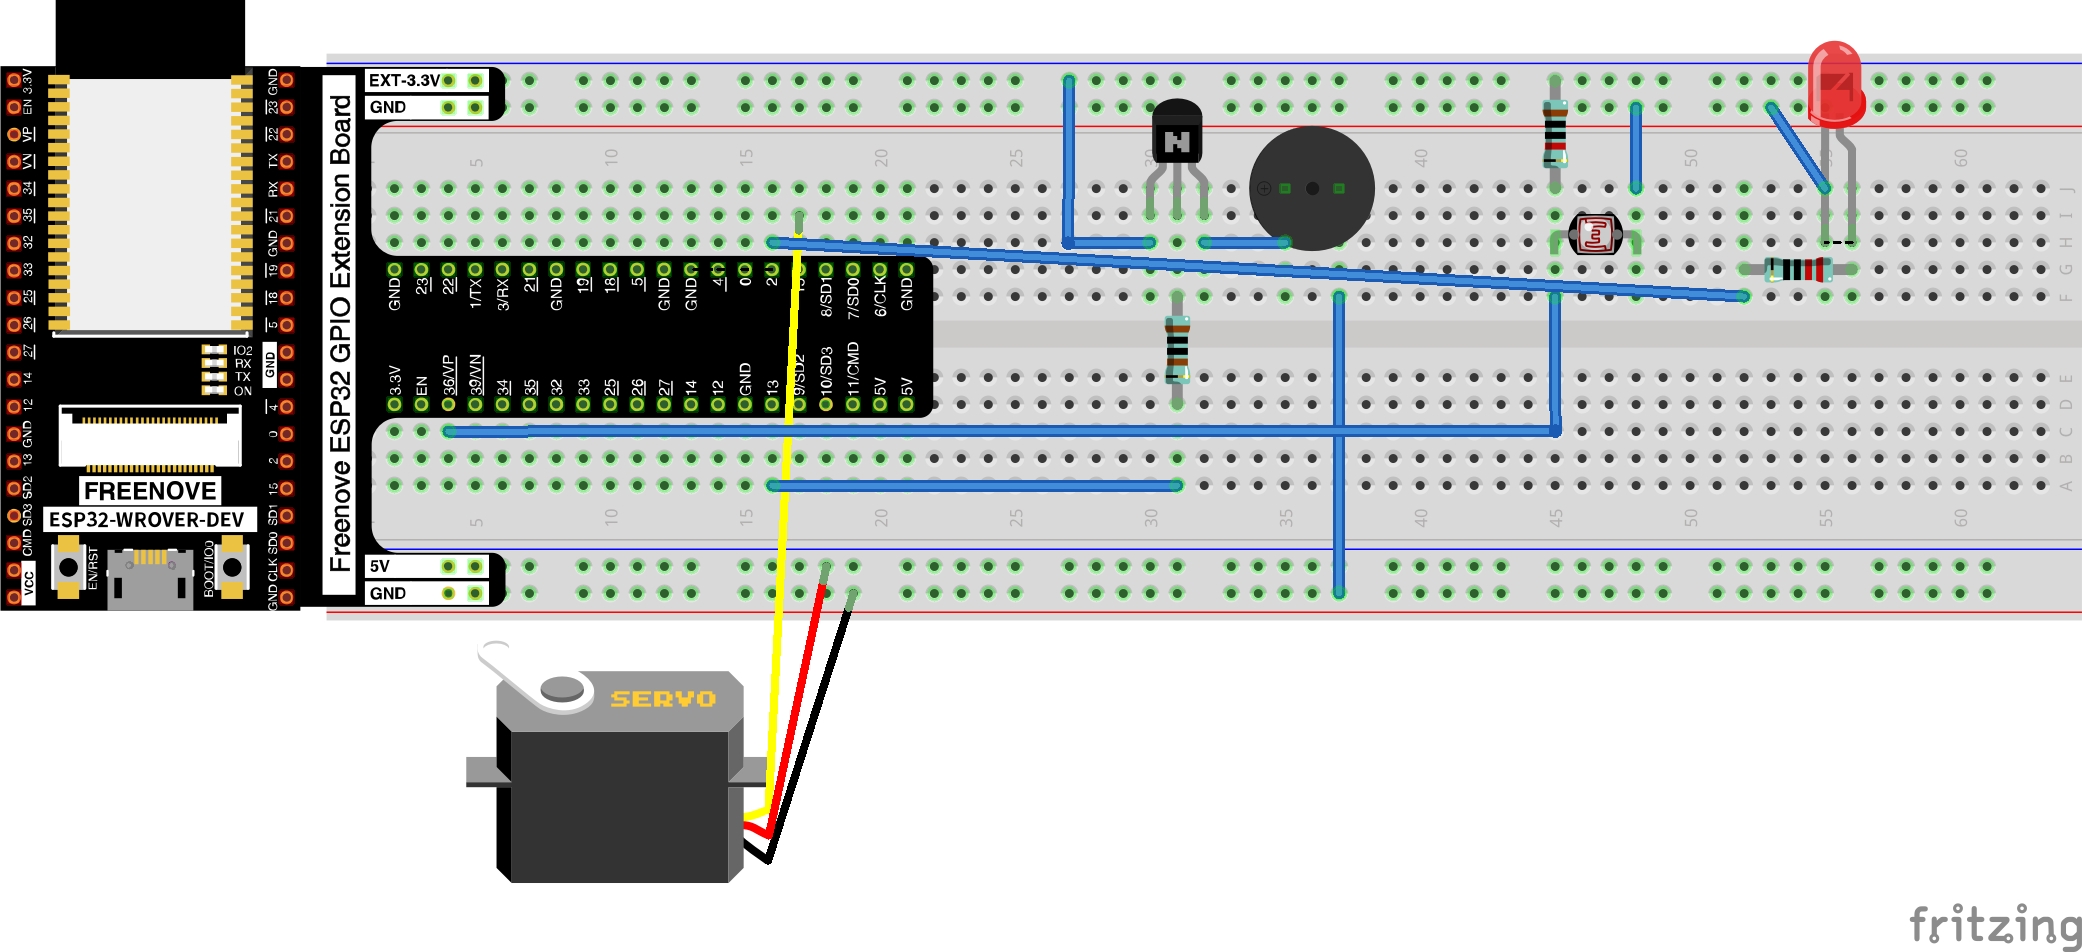
Project 1 - Servo, a passive buzzer, an LED, and a photoresistor
Date: 10/30/23
Instructions:
Design and construct a circuit with a servo or stepper motor, a buzzer, a photoresistor, an LED, and other necessary electronic components. Attach a hand shape made from paper to the motor. When the room is bright, the circuit does nothing. But when the room becomes dark (or you cover the photoresistor with your hand), the circuit waves the hand, makes the LED blink, and plays a sad song (a good-bye song), similar to this (https://makeabilitylab.github.io/physcomp/) but using a photoresistor instead of computer vision. Capture your settings and working circuit in photos and videos (the videos should include sound).
Parts:
- ESP32-WROVER x1
- GPIO Extension Board x1 (optional)
- Breadboard x1
- Jumper M/M x15
- Servo Motor x1
- 9V Battery 1x
- Photoresistor 1x
- NPN transistor x1
- Passive Buzzer 220Ω x7
- Resistor 1kΩ x1
- Resistor 10kΩ x1
- Resistor 200Ω x1
Servo, a passive buzzer, an LED, and a photoresistor Schema:
Servo, a passive buzzer, an LED, and a photoresistor Breadboard View:
Source Code:
project-1.py
import time
from machine import Pin, PWM, ADC
import _thread

#############################################################
# Used code from Freenove Ultimate kit ESP32 tutorial 18.1
#############################################################

class myServo(object):
    def __init__(self, pin: int = 15, hz: int = 50):
        self._servo = PWM(Pin(pin), hz)

    def myServoWriteDuty(self, duty):
        if duty <= 26:
            duty = 26
        if duty >= 128:
            duty = 128
        self._servo.duty(duty)

    def myServoWriteAngle(self, pos):
        if pos <= 0:
            pos = 0
        if pos >= 180:
            pos = 180
        pos_buffer = (pos/180)*(128-26)
        self._servo.duty(int(pos_buffer)+26)

    def myServoWriteTime(self, us):
        if us <= 500:
            us = 500
        if us >= 2500:
            us = 2500
        pos_buffer = (1024*us)/20000
        self._servo.duty(int(pos_buffer))

    def deinit(self):
        self._servo.deinit()

#############################################################
# Project code
#############################################################

servo = myServo(15)  # set servo pin
servo.myServoWriteAngle(0)  # Set Servo Angle
time.sleep_ms(1000)

# used from https://github.com/hibit-dev/buzzer/blob/master/lib/pitches.zip
NOTES = {
    "B0": 31, "C1": 33, "CS1": 35, "D1": 37, "DS1": 39, "E1": 41, "F1": 44, "FS1": 46,
    "G1": 49, "GS1": 52, "A1": 55, "AS1": 58, "B1": 62, "C2": 65, "CS2": 69, "D2": 73,
    "DS2": 78, "E2": 82, "F2": 87, "FS2": 93, "G2": 98, "GS2": 104, "A2": 110, "AS2": 117,
    "B2": 123, "C3": 131, "CS3": 139, "DB3": 139, "D3": 147, "DS3": 156, "EB3": 156,
    "E3": 165, "F3": 175, "FS3": 185, "G3": 196, "GS3": 208, "A3": 220, "AS3": 233,
    "B3": 247, "C4": 262, "CS4": 277, "D4": 294, "DS4": 311, "E4": 330, "F4": 349,
    "FS4": 370, "G4": 392, "GS4": 415, "A4": 440, "AS4": 466, "B4": 494, "C5": 523,
    "CS5": 554, "D5": 587, "DS5": 622, "E5": 659, "F5": 698, "FS5": 740, "G5": 784,
    "GS5": 831, "A5": 880, "AS5": 932, "B5": 988, "C6": 1047, "CS6": 1109, "D6": 1175,
    "DS6": 1245, "E6": 1319, "F6": 1397, "FS6": 1480, "G6": 1568, "GS6": 1661, "A6": 1760,
    "AS6": 1865, "B6": 1976, "C7": 2093, "CS7": 2217, "D7": 2349, "DS7": 2489, "E7": 2637,
    "F7": 2794, "FS7": 2960, "G7": 3136, "GS7": 3322, "A7": 3520, "AS7": 3729, "B7": 3951,
    "C8": 4186, "CS8": 4435, "D8": 4699, "DS8": 4978, "REST": 0
}

# Notes for "Beach House - Space Song"
notes = [
    NOTES["E4"], NOTES["E4"], NOTES["F4"], NOTES["E4"], NOTES["D4"],
    NOTES["E4"], NOTES["D4"], NOTES["C4"], NOTES["D4"], NOTES["E4"],

    NOTES["F4"], NOTES["E4"], NOTES["D4"], NOTES["E4"], NOTES["D4"],
    NOTES["C4"], NOTES["B4"], NOTES["E4"], NOTES["F4"], NOTES["E4"],

    NOTES["D4"], NOTES["E4"], NOTES["E4"], NOTES["D4"], NOTES["C4"],
    NOTES["D4"], NOTES["E4"], NOTES["D4"], NOTES["C4"], NOTES["B4"],

    NOTES["C4"],

    NOTES["C4"],  NOTES["C4"],  NOTES["B4"], NOTES["A4"], NOTES["E4"],
    NOTES["C4"], NOTES["B4"], NOTES["A4"], NOTES["E4"]
]

duration = [
    4, 2, 1, 1, 1,
    3, 1, 1, 1, 3,

    1, 1, 1, 3, 1,
    1, 1, 3, 1, 1,

    1, 1, 3, 1, 1,
    1, 3, 1, 1, 1,
    2,
    # repeat
    1, 1, 2, 2, 3,
    2, 2, 2, 3,
]


buttonOff = Pin(12, Pin.IN, Pin.PULL_UP)
buttonOn = Pin(14, Pin.IN, Pin.PULL_UP)

passiveBuzzer = PWM(Pin(13), 2000)

adc = ADC(Pin(36))
adc.atten(ADC.ATTN_11DB)
adc.width(ADC.WIDTH_10BIT)
led = Pin(2, Pin.OUT)


def playSong():
    global runCore2
    while True:
        passiveBuzzer.init()
        if runCore2:
            for i in range(len(notes)):
                passiveBuzzer.freq(notes[i])
                led.value(1)
                time.sleep_ms(300*duration[i])
                led.value(0)
                if not runCore2:
                    break
        passiveBuzzer.deinit()


try:
    runCore2 = False
    second_thread = _thread.start_new_thread(playSong, ())
    while True:
        adcValue = adc.read()
        time.sleep_ms(100)
        if adcValue > 900:  # when the it's dark LED is on and dimmed
            runCore2 = True
            for i in range(0, 45, 1): # servo goes up
                servo.myServoWriteAngle(i)
                led.value(1)
                time.sleep_ms(15)
                led.value(0)
            for i in range(45, 0, -1): # servo goes down
                servo.myServoWriteAngle(i)
                led.value(1)
                time.sleep_ms(15)
                led.value(0)
        time.sleep_ms(100)
        runCore2 = False
except:
    servo.deinit()
    passiveBuzzer.deinit()
Youtube video ↓ (click on it)

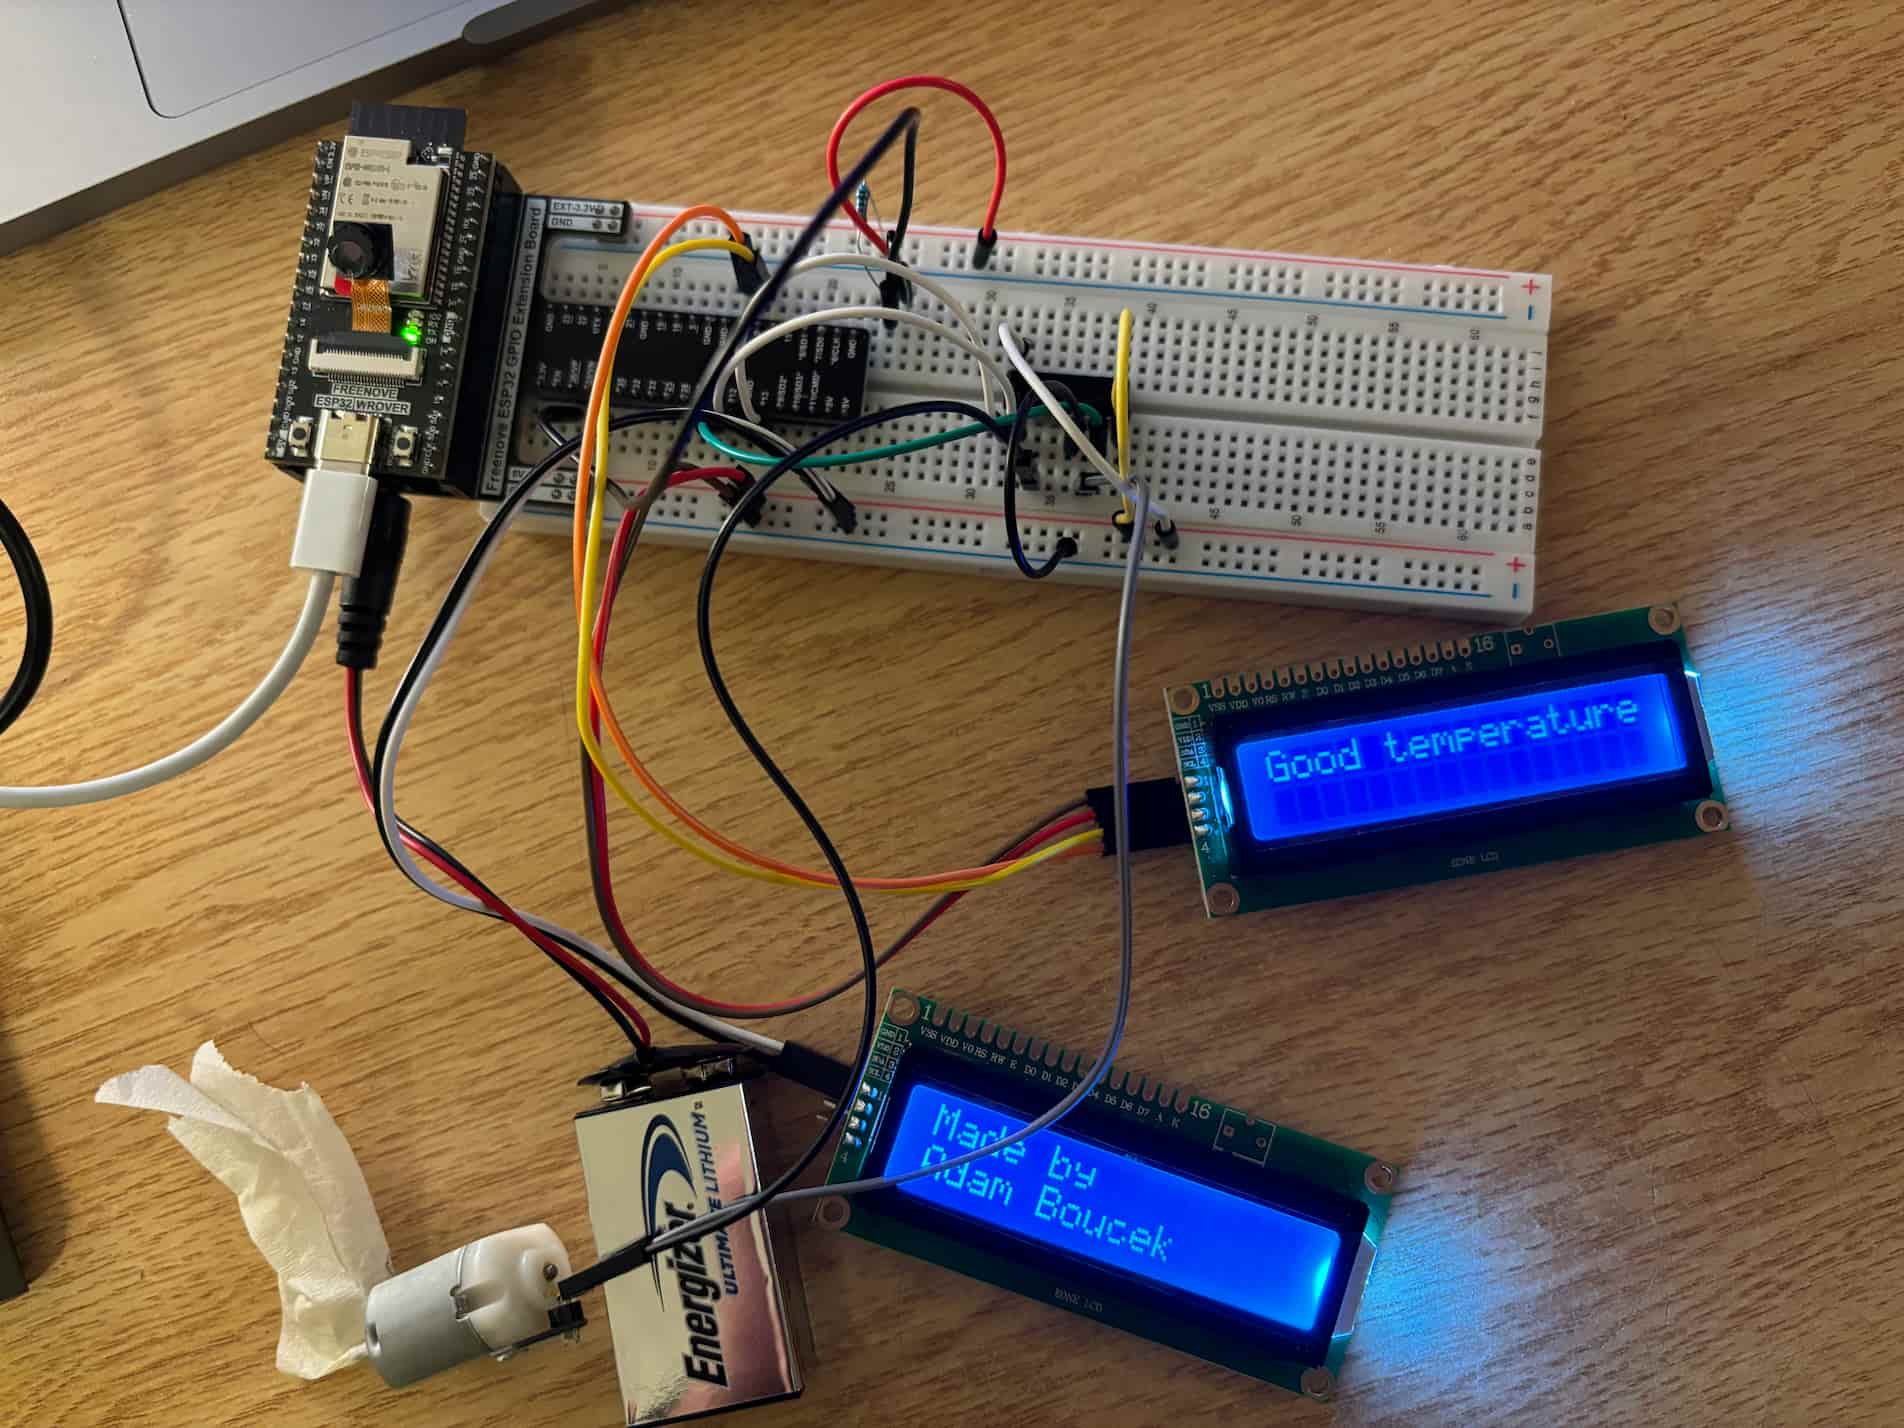
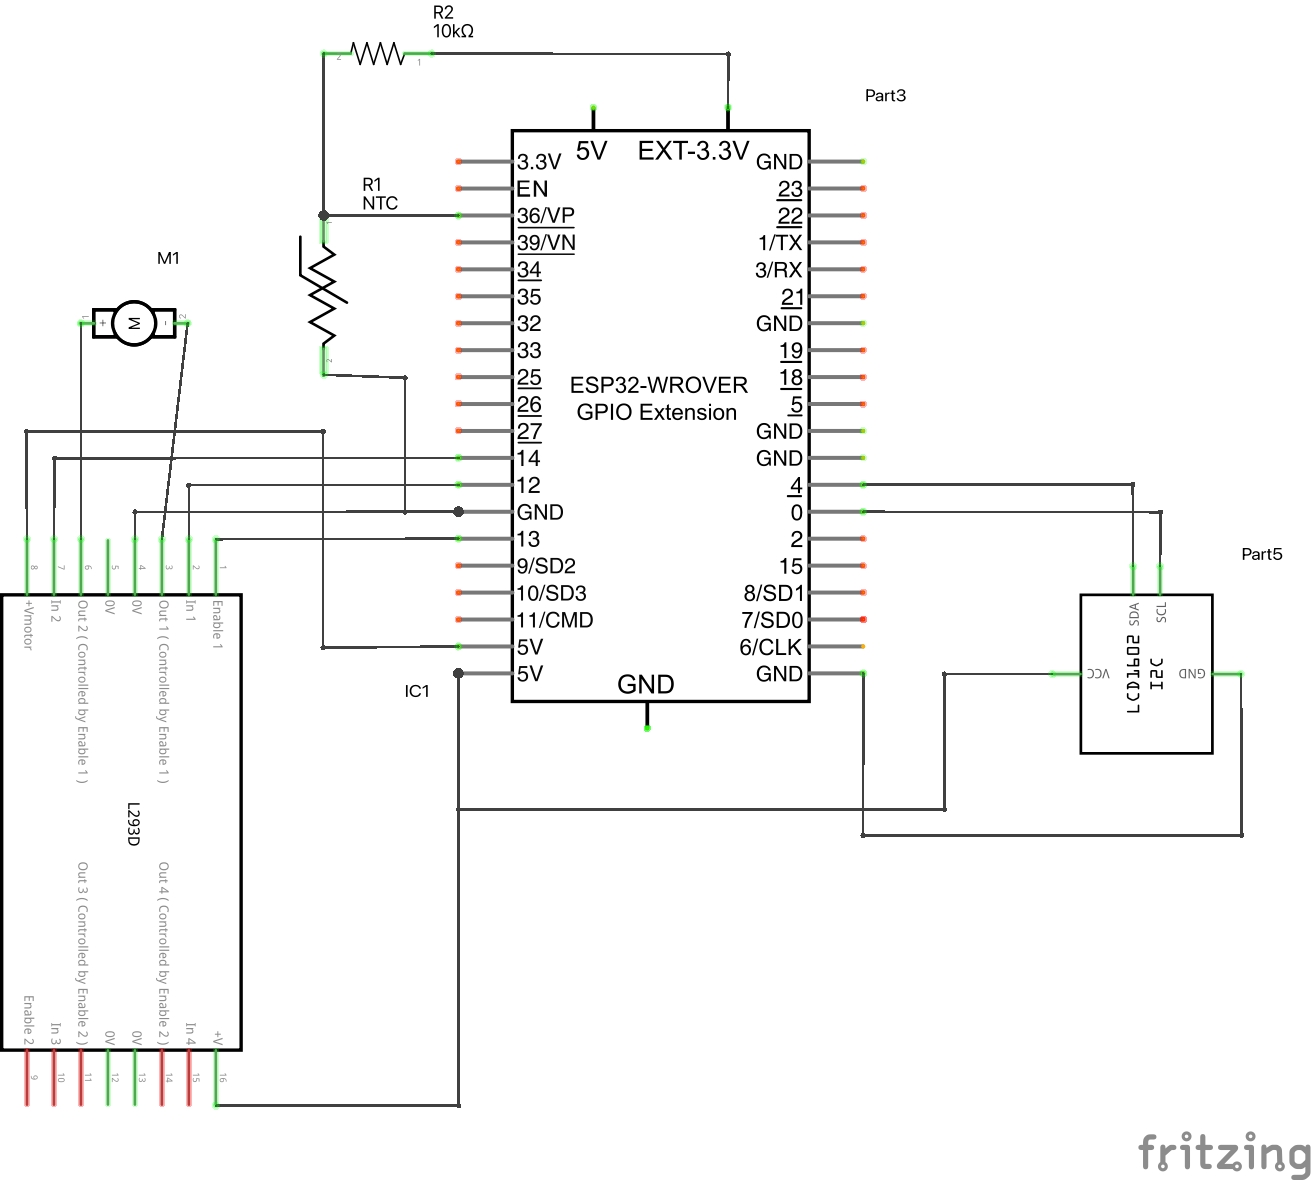
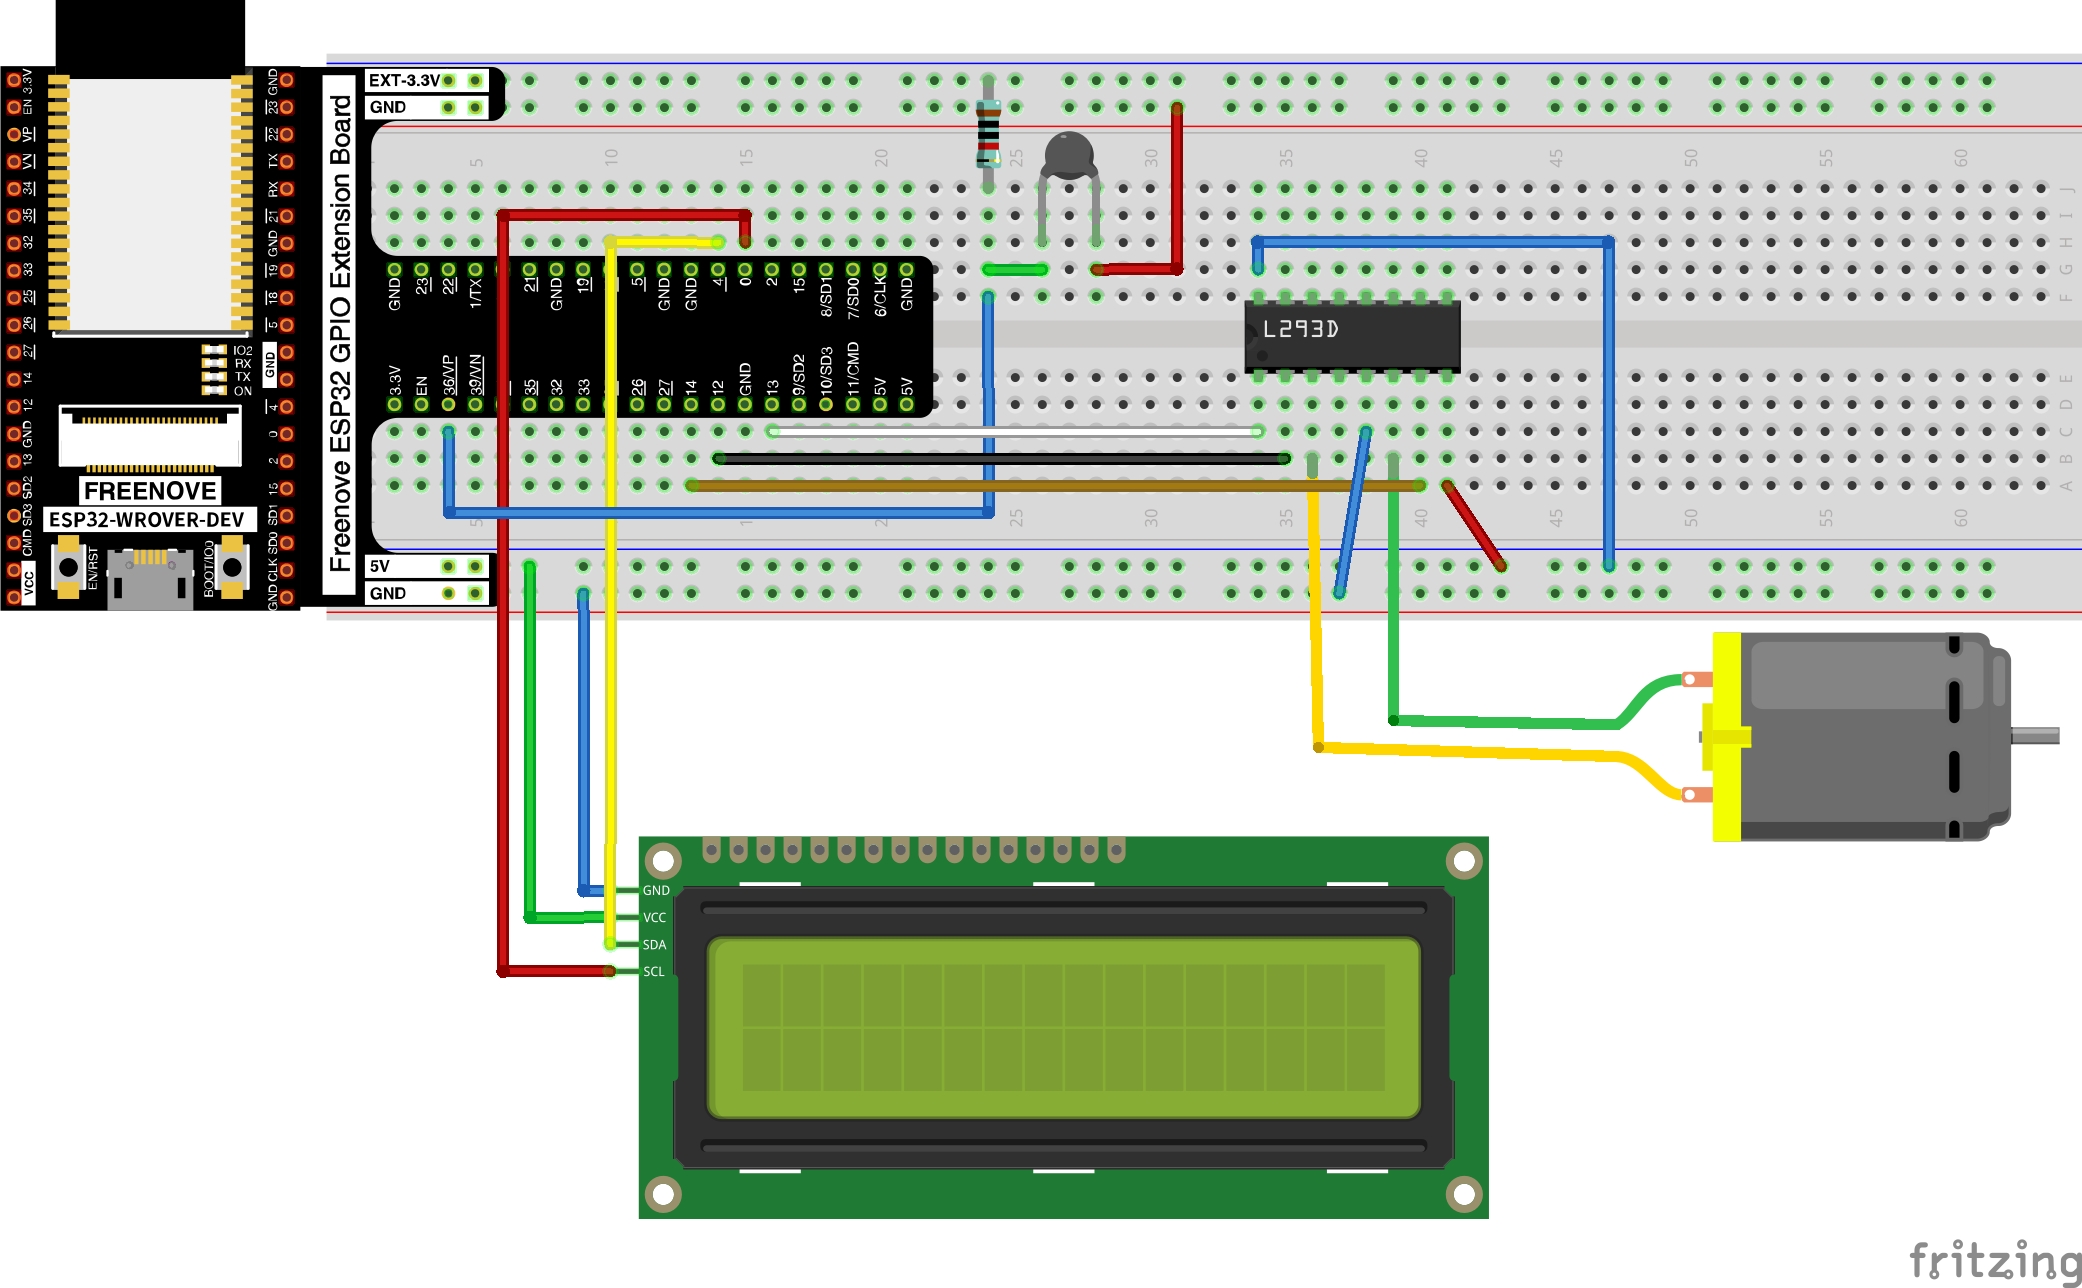
Project 2 - DC Motor, an LCD 1602, and a thermistor
Date: 10/30/23
Instructions:
Design and construct a circuit that spins a fan blade with some message on an LCD display when the temperature is high enough using a DC motor, an LCD 1602, a thermistor, and other necessary electronic components. Attach a fan blade made from paper to the DC motor. When the temperature reaches the threshold temperature (you can do this using your hand or a hair dryer with hot air), the fan starts to spin with the message on the LCD display such as “Cool yourself down.” When the temperature is below the threshold temperature, the LCD display shows some other message such as “Good temperature.” Capture your settings and working circuit in photos and videos (the videos should include sound).
Parts:
- ESP32-WROVER x1
- GPIO Extension Board x1 (optional)
- Breadboard x1
- LCD 1602 x1
- Jumper M/M x15
- DC Motor x1
- 9V Battery 1x
- Thermistor x1
- L293D Chip 2x
- Resistor 10kΩ x1
DC Motor, an LCD 1602, and a thermistor schema:
DC Motor, an LCD 1602, and a thermistor Breadboard View:
Source Code:
project-2.py
from time import sleep_ms
from machine import Pin, ADC, I2C
import time
import math

#############################################################
# used a class from Freenove Ultimate kit ESP32 tutorial 20.1
#############################################################


class LcdApi:
    # The following constant names were lifted from the avrlib lcd.h
    # header file, however, I changed the definitions from bit numbers
    # to bit masks.
    #
    # LCD controller command set

    LCD_CLR = 0x01              # DB0: clear display
    LCD_HOME = 0x02             # DB1: return to home position

    LCD_ENTRY_MODE = 0x04       # DB2: set entry mode
    LCD_ENTRY_INC = 0x02        # --DB1: increment
    LCD_ENTRY_SHIFT = 0x01      # --DB0: shift

    LCD_ON_CTRL = 0x08          # DB3: turn lcd/cursor on
    LCD_ON_DISPLAY = 0x04       # --DB2: turn display on
    LCD_ON_CURSOR = 0x02        # --DB1: turn cursor on
    LCD_ON_BLINK = 0x01         # --DB0: blinking cursor

    LCD_MOVE = 0x10             # DB4: move cursor/display
    LCD_MOVE_DISP = 0x08        # --DB3: move display (0-> move cursor)
    LCD_MOVE_RIGHT = 0x04       # --DB2: move right (0-> left)

    LCD_FUNCTION = 0x20         # DB5: function set
    LCD_FUNCTION_8BIT = 0x10    # --DB4: set 8BIT mode (0->4BIT mode)
    LCD_FUNCTION_2LINES = 0x08  # --DB3: two lines (0->one line)
    LCD_FUNCTION_10DOTS = 0x04  # --DB2: 5x10 font (0->5x7 font)
    LCD_FUNCTION_RESET = 0x30   # See "Initializing by Instruction" section

    LCD_CGRAM = 0x40            # DB6: set CG RAM address
    LCD_DDRAM = 0x80            # DB7: set DD RAM address

    LCD_RS_CMD = 0
    LCD_RS_DATA = 1

    LCD_RW_WRITE = 0
    LCD_RW_READ = 1

    def __init__(self, num_lines, num_columns):
        self.num_lines = num_lines
        if self.num_lines > 4:
            self.num_lines = 4
        self.num_columns = num_columns
        if self.num_columns > 40:
            self.num_columns = 40
        self.cursor_x = 0
        self.cursor_y = 0
        self.backlight = True
        self.display_off()
        self.backlight_on()
        self.clear()
        self.hal_write_command(self.LCD_ENTRY_MODE | self.LCD_ENTRY_INC)
        self.hide_cursor()
        self.display_on()

    def clear(self):
        """Clears the LCD display and moves the cursor to the top left
        corner.
        """
        self.hal_write_command(self.LCD_CLR)
        self.hal_write_command(self.LCD_HOME)
        self.cursor_x = 0
        self.cursor_y = 0

    def show_cursor(self):
        """Causes the cursor to be made visible."""
        self.hal_write_command(self.LCD_ON_CTRL | self.LCD_ON_DISPLAY |
                               self.LCD_ON_CURSOR)

    def hide_cursor(self):
        """Causes the cursor to be hidden."""
        self.hal_write_command(self.LCD_ON_CTRL | self.LCD_ON_DISPLAY)

    def blink_cursor_on(self):
        """Turns on the cursor, and makes it blink."""
        self.hal_write_command(self.LCD_ON_CTRL | self.LCD_ON_DISPLAY |
                               self.LCD_ON_CURSOR | self.LCD_ON_BLINK)

    def blink_cursor_off(self):
        """Turns on the cursor, and makes it no blink (i.e. be solid)."""
        self.hal_write_command(self.LCD_ON_CTRL | self.LCD_ON_DISPLAY |
                               self.LCD_ON_CURSOR)

    def display_on(self):
        """Turns on (i.e. unblanks) the LCD."""
        self.hal_write_command(self.LCD_ON_CTRL | self.LCD_ON_DISPLAY)

    def display_off(self):
        """Turns off (i.e. blanks) the LCD."""
        self.hal_write_command(self.LCD_ON_CTRL)

    def backlight_on(self):
        """Turns the backlight on.

        This isn't really an LCD command, but some modules have backlight
        controls, so this allows the hal to pass through the command.
        """
        self.backlight = True
        self.hal_backlight_on()

    def backlight_off(self):
        """Turns the backlight off.

        This isn't really an LCD command, but some modules have backlight
        controls, so this allows the hal to pass through the command.
        """
        self.backlight = False
        self.hal_backlight_off()

    def move_to(self, cursor_x, cursor_y):
        """Moves the cursor position to the indicated position. The cursor
        position is zero based (i.e. cursor_x == 0 indicates first column).
        """
        self.cursor_x = cursor_x
        self.cursor_y = cursor_y
        addr = cursor_x & 0x3f
        if cursor_y & 1:
            addr += 0x40    # Lines 1 & 3 add 0x40
        if cursor_y & 2:
            addr += 0x14    # Lines 2 & 3 add 0x14
        self.hal_write_command(self.LCD_DDRAM | addr)

    def putchar(self, char):
        """Writes the indicated character to the LCD at the current cursor
        position, and advances the cursor by one position.
        """
        if char != '\n':
            self.hal_write_data(ord(char))
            self.cursor_x += 1
        if self.cursor_x >= self.num_columns or char == '\n':
            self.cursor_x = 0
            self.cursor_y += 1
            if self.cursor_y >= self.num_lines:
                self.cursor_y = 0
            self.move_to(self.cursor_x, self.cursor_y)

    def putstr(self, string):
        """Write the indicated string to the LCD at the current cursor
        position and advances the cursor position appropriately.
        """
        for char in string:
            self.putchar(char)

    def custom_char(self, location, charmap):
        """Write a character to one of the 8 CGRAM locations, available
        as chr(0) through chr(7).
        """
        location &= 0x7
        self.hal_write_command(self.LCD_CGRAM | (location << 3))
        self.hal_sleep_us(40)
        for i in range(8):
            self.hal_write_data(charmap[i])
            self.hal_sleep_us(40)
        self.move_to(self.cursor_x, self.cursor_y)

    def hal_backlight_on(self):
        """Allows the hal layer to turn the backlight on.

        If desired, a derived HAL class will implement this function.
        """
        pass

    def hal_backlight_off(self):
        """Allows the hal layer to turn the backlight off.

        If desired, a derived HAL class will implement this function.
        """
        pass

    def hal_write_command(self, cmd):
        """Write a command to the LCD.

        It is expected that a derived HAL class will implement this
        function.
        """
        raise NotImplementedError

    def hal_write_data(self, data):
        """Write data to the LCD.

        It is expected that a derived HAL class will implement this
        function.
        """
        raise NotImplementedError

    def hal_sleep_us(self, usecs):
        """Sleep for some time (given in microseconds)."""
        time.sleep_us(usecs)


# The PCF8574 has a jumper selectable address: 0x20 - 0x27
DEFAULT_I2C_ADDR = 0x27

# Defines shifts or masks for the various LCD line attached to the PCF8574

MASK_RS = 0x01
MASK_RW = 0x02
MASK_E = 0x04
SHIFT_BACKLIGHT = 3
SHIFT_DATA = 4


class I2cLcd(LcdApi):
    def __init__(self, i2c, i2c_addr, num_lines, num_columns):
        self.i2c = i2c
        self.i2c_addr = i2c_addr
        self.i2c.writeto(self.i2c_addr, bytearray([0]))
        sleep_ms(20)   # Allow LCD time to powerup
        # Send reset 3 times
        self.hal_write_init_nibble(self.LCD_FUNCTION_RESET)
        sleep_ms(5)    # need to delay at least 4.1 msec
        self.hal_write_init_nibble(self.LCD_FUNCTION_RESET)
        sleep_ms(1)
        self.hal_write_init_nibble(self.LCD_FUNCTION_RESET)
        sleep_ms(1)
        # Put LCD into 4 bit mode
        self.hal_write_init_nibble(self.LCD_FUNCTION)
        sleep_ms(1)
        LcdApi.__init__(self, num_lines, num_columns)
        cmd = self.LCD_FUNCTION
        if num_lines > 1:
            cmd |= self.LCD_FUNCTION_2LINES
        self.hal_write_command(cmd)

    def hal_write_init_nibble(self, nibble):
        """Writes an initialization nibble to the LCD.

        This particular function is only used during initialization.
        """
        byte = ((nibble >> 4) & 0x0f) << SHIFT_DATA
        self.i2c.writeto(self.i2c_addr, bytearray([byte | MASK_E]))
        self.i2c.writeto(self.i2c_addr, bytearray([byte]))

    def hal_backlight_on(self):
        """Allows the hal layer to turn the backlight on."""
        self.i2c.writeto(self.i2c_addr, bytearray([1 << SHIFT_BACKLIGHT]))

    def hal_backlight_off(self):
        """Allows the hal layer to turn the backlight off."""
        self.i2c.writeto(self.i2c_addr, bytearray([0]))

    def hal_write_command(self, cmd):
        """Writes a command to the LCD.

        Data is latched on the falling edge of E.
        """
        byte = ((self.backlight << SHIFT_BACKLIGHT) |
                (((cmd >> 4) & 0x0f) << SHIFT_DATA))
        self.i2c.writeto(self.i2c_addr, bytearray([byte | MASK_E]))
        self.i2c.writeto(self.i2c_addr, bytearray([byte]))
        byte = ((self.backlight << SHIFT_BACKLIGHT)
                | ((cmd & 0x0f) << SHIFT_DATA))
        self.i2c.writeto(self.i2c_addr, bytearray([byte | MASK_E]))
        self.i2c.writeto(self.i2c_addr, bytearray([byte]))
        if cmd <= 3:
            # The home and clear commands require a worst case delay of 4.1 msec
            sleep_ms(5)

    def hal_write_data(self, data):
        """Write data to the LCD."""
        byte = (MASK_RS | (self.backlight << SHIFT_BACKLIGHT)
                | (((data >> 4) & 0x0f) << SHIFT_DATA))
        self.i2c.writeto(self.i2c_addr, bytearray([byte | MASK_E]))
        self.i2c.writeto(self.i2c_addr, bytearray([byte]))
        byte = (MASK_RS | (self.backlight << SHIFT_BACKLIGHT)
                | ((data & 0x0f) << SHIFT_DATA))
        self.i2c.writeto(self.i2c_addr, bytearray([byte | MASK_E]))
        self.i2c.writeto(self.i2c_addr, bytearray([byte]))


i2c = I2C(scl=Pin(4), sda=Pin(0), freq=400000)
devices = i2c.scan()
if len(devices) == 0:
    print("No i2c device !")
else:
    for device in devices:
        print("I2C addr: "+hex(device))
        lcd = I2cLcd(i2c, device, 2, 16)


#############################################################
# Project Code
#############################################################

in1Pin = Pin(12, Pin.OUT)
in2Pin = Pin(14, Pin.OUT)

enablePin = Pin(13, Pin.OUT)

button = Pin(15, Pin.IN, Pin.PULL_UP)
adc = ADC(Pin(36))
tempCel = 30


def driveMotor(dir):
    if dir:
        in1Pin.value(1)
        in2Pin.value(0)
    else:
        in1Pin.value(0)
        in2Pin.value(0)


def tempCalc():
    global tempCel
    adcValue = adc.read()
    voltage = adcValue/4095*3.3
    Rt = 10*voltage/(3.3-voltage)
    tempK = (1/(1/(273.15+25)+(math.log(Rt/10))/3950))
    tempCel = tempK-273.15
    time.sleep_ms(1000)


adc.atten(ADC.ATTN_11DB)
adc.width(ADC.WIDTH_12BIT)

while True:
    tempCalc()
    if tempCel > 30:
        in1Pin.value(1)
        in2Pin.value(0)
        enablePin.value(1)
        lcd.move_to(0, 0)
        lcd.putstr("Cool yourself   down")
    else:
        enablePin.value(0)
        lcd.move_to(0, 0)
        lcd.putstr("Good temperature      ")
Youtube video ↓ (click on it)

Tutorials
To move forward I can show you what cool things you can make with the Freenove tutorials. They are well-guided and a lot of fun.
| Tutorial No. | Gif |
|---|---|
| 17.1 |  |
| 17.2 | 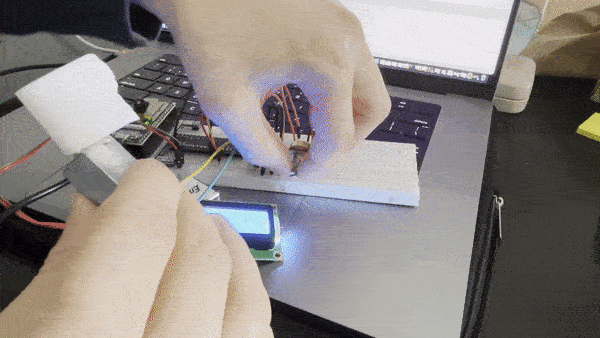 |
| 18.1 | 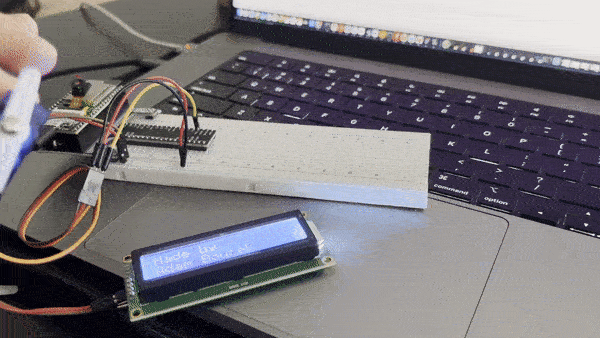 |
| 18.2 |  |
| 19.1 |  |
| 20.1 | 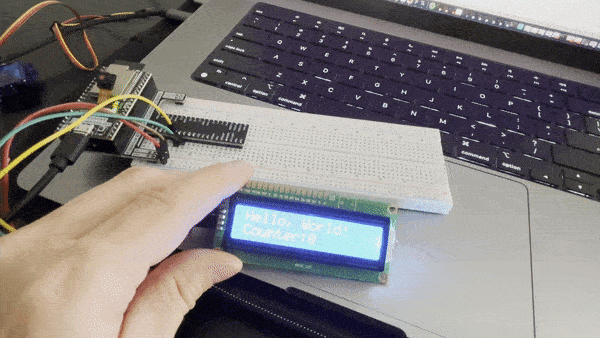 |